96-2011 DR650SE Dual Sport Thumper

mxrob
MegaSquirt Newbie
Posts: 17
Joined: Mon Dec 14, 2009 12:21 pm

96-2011 DR650SE Dual Sport Thumper

Post by mxrob »

Right now it's a partial success. I have the bike running on µs with MSExtra 3.03u ignition only running wasted spark and a hall sensor on a 36/1 crankwheel. The goal is sequential but attempting to get VR2 working had stymied project progress to the point of frustration so I went with wasted spark for now so I can get fuel set-up. I'm not giving up on VR2 and my cam sensor... just ignoring them for awhile. :lol:

I decided to start with ignition first since that seems to be the hardest to get a handle on, at least for motorcycles anyway, based on what I've read in the forums. And man have I :RTFM: a lot or what! :mrgreen:

So here's what I've got going so far:

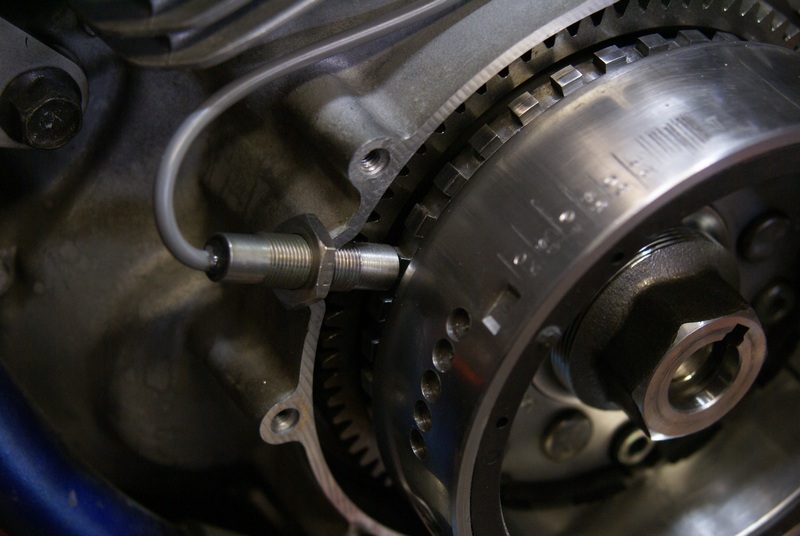
I went with a 36 tooth wheel to keep timing accuracy. I feel this is especially important for a lower RPM thumper like the DR650. And I can tell you it has made a huge difference in my bike compared to the stock CDI. It runs so much better down low when the engine is just thumping it's amazing. Fuel econmy has jumped up from 54 mpg to over 57 mpg without touching the carb in any way. Gotta love that spark advance table (the stock Suzuki CDI is a dumb RPM only advance).

I used a Hamlin 55075 12mm gear tooth hall sensor http://www.hamlin.com/technical-detail-hall-sensor.cfm and made a 36/1 tooth wheel out of the stock extra flywheel weight Suzuki attaches to the back of the rotor. This for me was easier than trying to dink around using the stock VR and it allowed me to figure out the stock timing advance (which Suzuki does not publish) and match up the trigger settings by running the bike on the stock CDI while watching the µs in action off to the side.

Image
Image

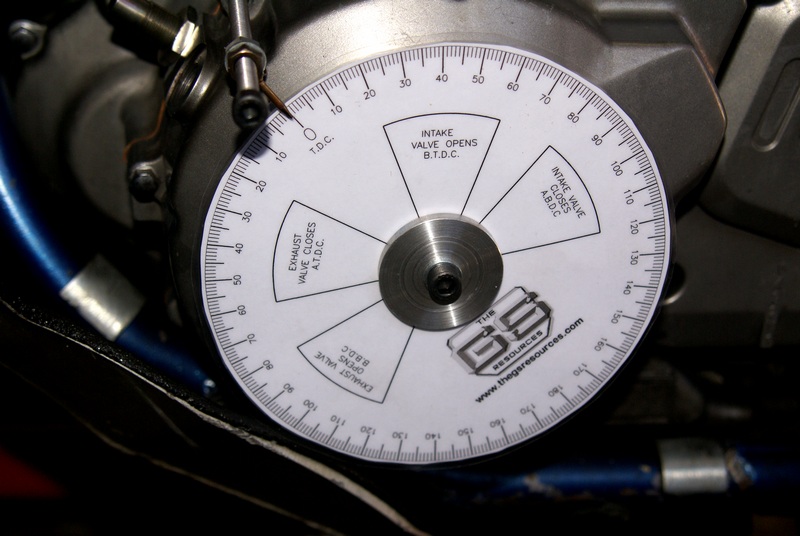
I built this degree wheel set-up so I could figure out what the stock Suzuki timing curve looked like for a good starting point:

Image


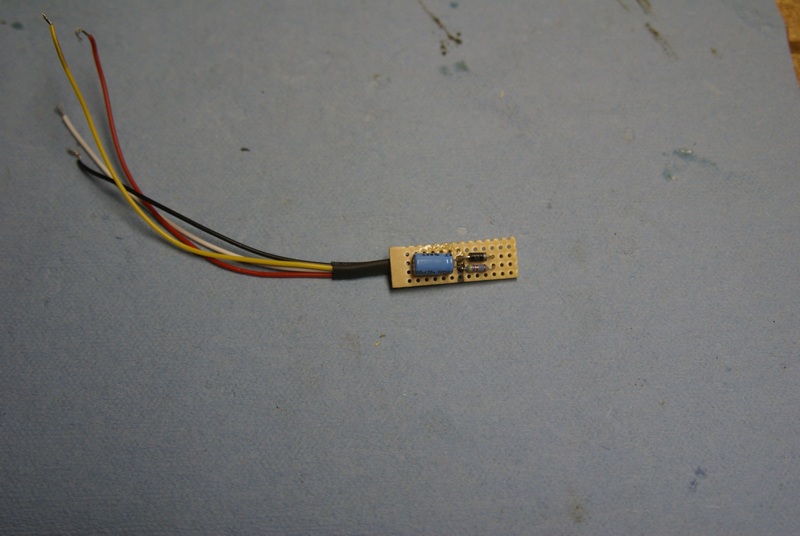
Next was to make the µs understand what the Hamlin was telling it. That took some dinking around but the final verdict is use VR1 with Bruce's hall offsetter circuit. http://microsquirt.com/viewtopic.php?f=87&t=22790 I could never get more than 5800 RPM out of opto without resets after trying a ton of different resistors. No matter... VR1 with the offsetter circuit runs well past my 8k red line with no issues. Here's my rendition before I potted it with electronics epoxy:

Image

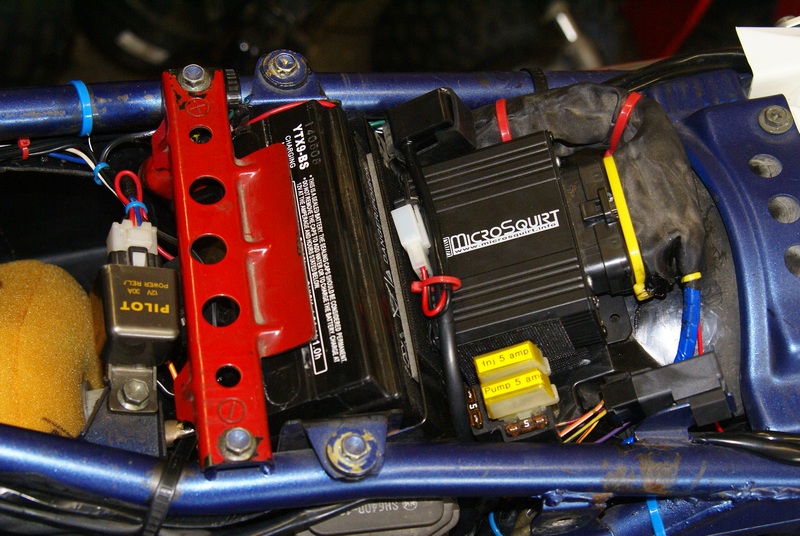
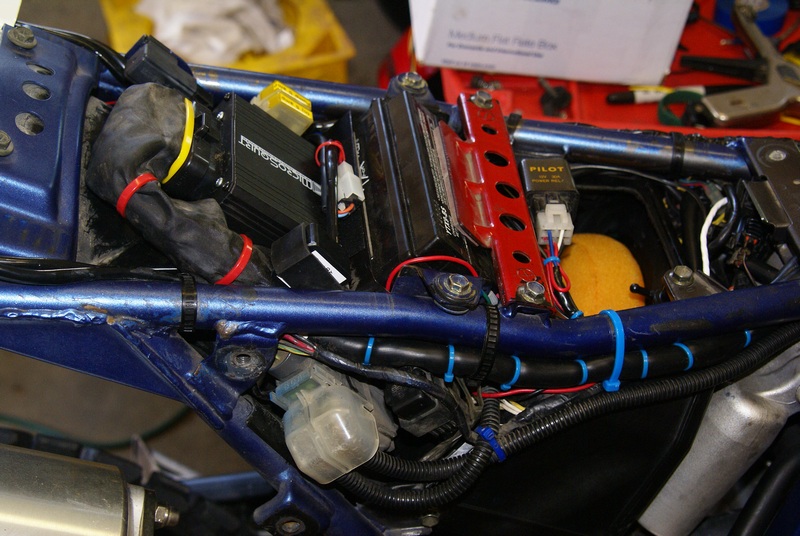
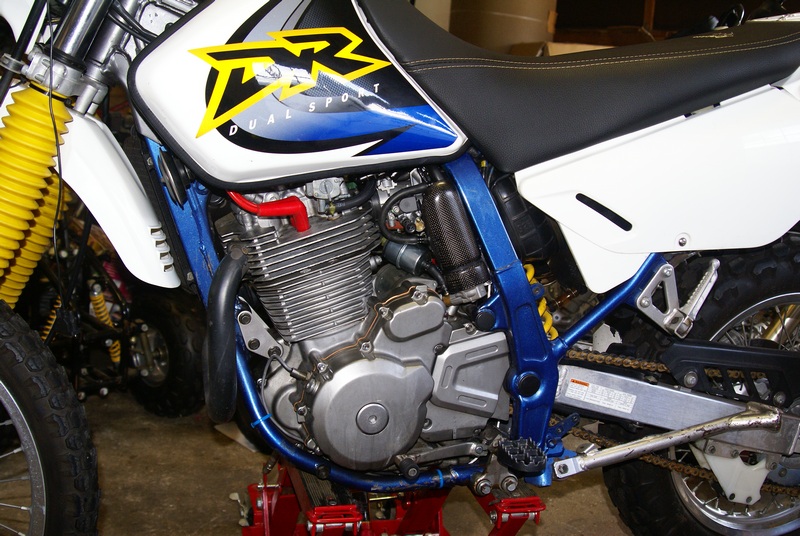
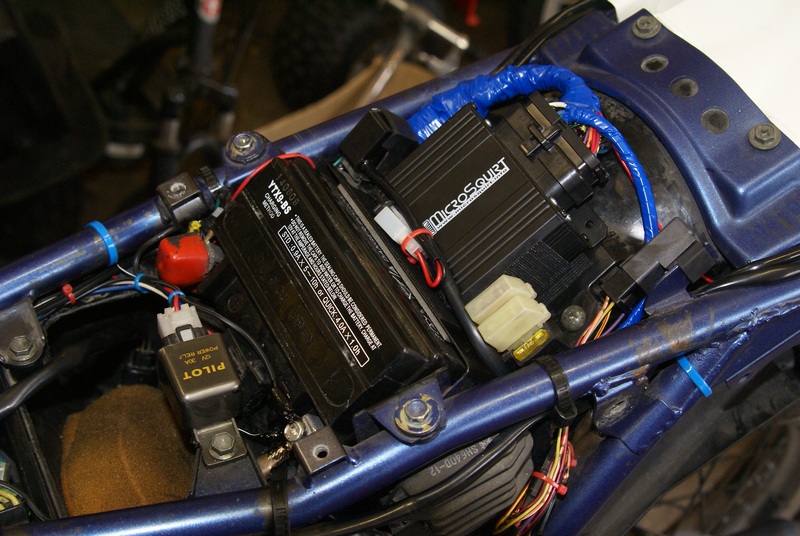
The µs fits nicely where the stock CDI once mounted. I had to whack off the mounting flange opposite the connector to get the µs as close to the battery box as possible for seat clearance. The µs is mounted with industrial velcro on the bottom and against the battery box. This added a bit of vibration isolation. I still ended up spacing the inner fender front mounting position down another 5/16 of an inch to keep the plastic seat pan from resting on the µs.

Image

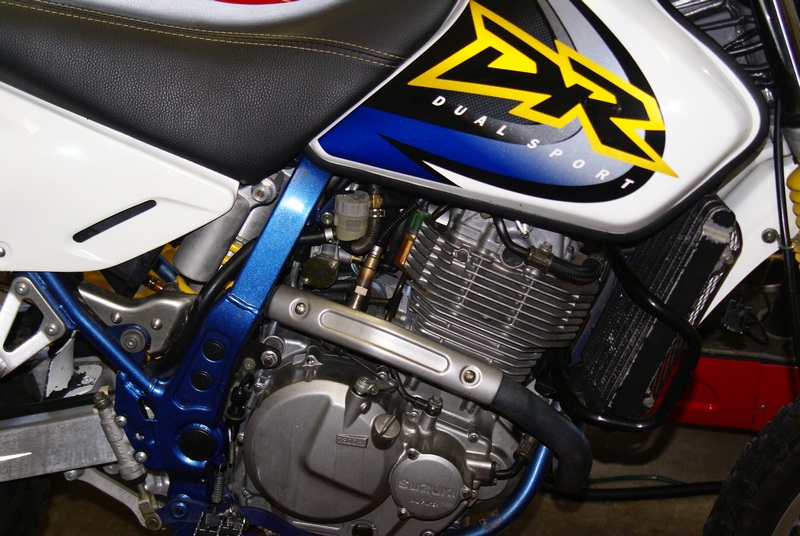
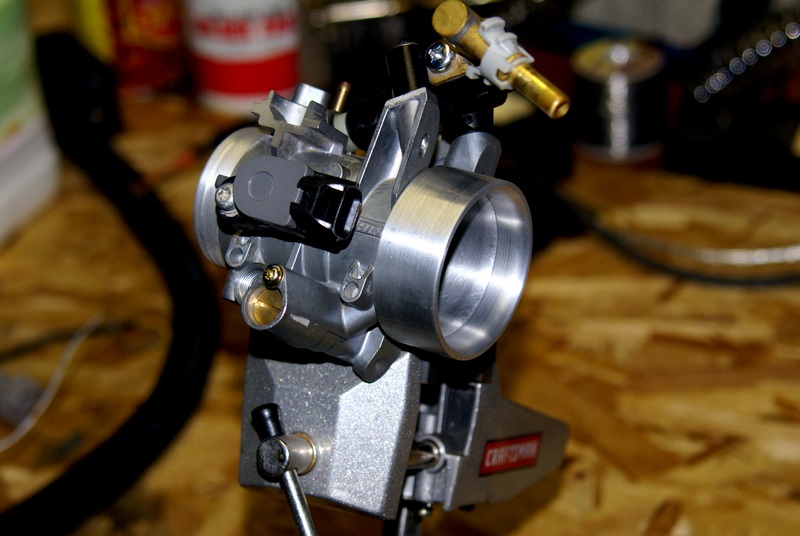
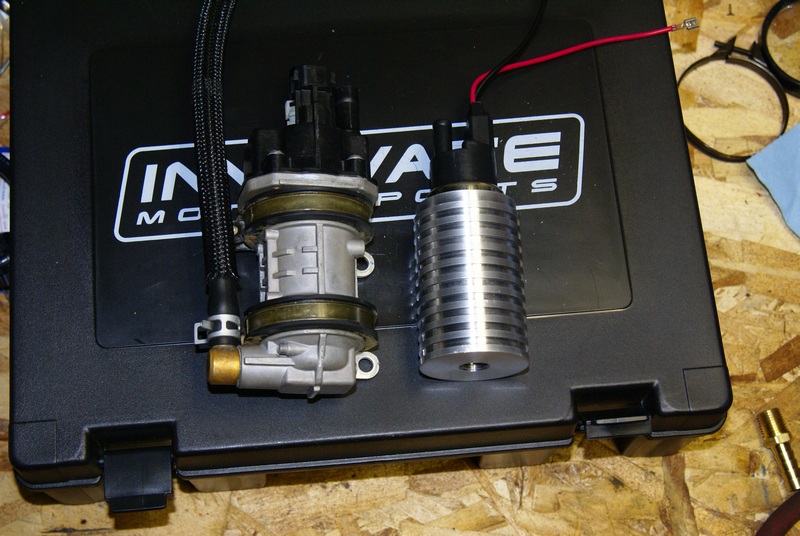
I'm using the TB and related components from a Suzuki LT-R450 fourwheeler. The TB bore is 42mm so it is not too oversized for the lower RPM big bore engine (the stock carb is 40mm). This is the R450's TB after I modded it to fit in the same physical space as the stock Suzuki carb (or the FCR-MX that I have on my bike now). I machined the nose OD to fit into the stock Suzuki intake manifold and turned an aluminum adapter for the intake bell to work with the stock air boot.

Image

The R450's fuel pump has a super low current draw which is great for the DR650's limited 200 watt stator. Here it is sitting next to my first FP rendition on the right (Toyota Camry pump + my machined housing) which ended up drawing way too much current for my bike's anemic charging system. I'm also using the R450's fuel pressure regulator and using my California model DR650's charcoal cannister return line on the fuel tank to return the excess fuel. The return line will also serve to flood the pump hosing and vent off any trapped air before reaching the pump.

Image

I still need to figure out a swirl tank... the stock R450's is way too big for the room I have so I'm thinking of making a vented fuel filter serve a dual purpose as a swirl tank. That should slow fuel velocity down enough to allow trapped air to escape and give the pump an extra reservoir of fuel.

Image


I bought a complete wiring harness for the R450 off ebay for all the water proof connectors and it even came with the FP relay, MAP, IAT, CLT mini dual circuit fuse box for the FP/Injector and all the extra wiring and harness protectors I could use after dissecting the harness.

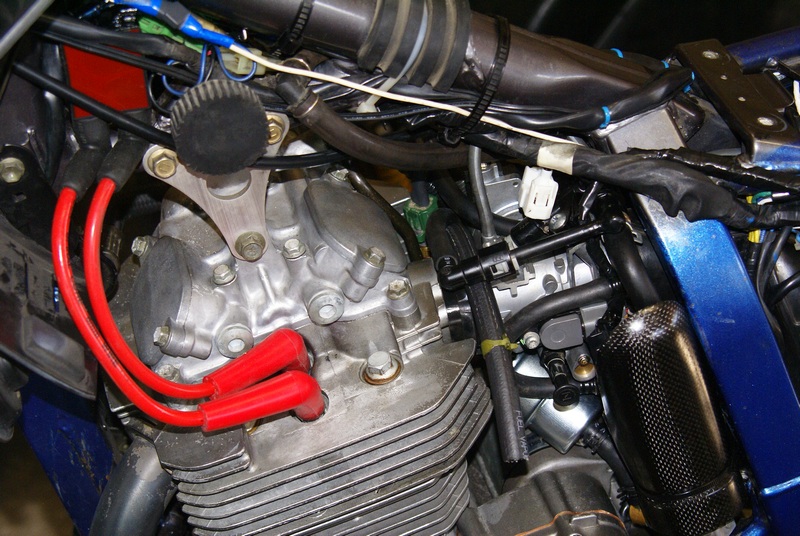
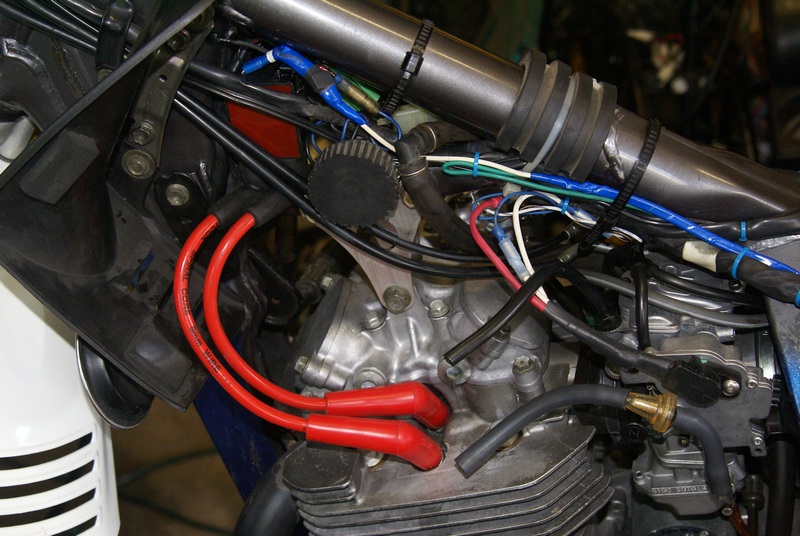
For a coil I went with a Nology PFC-06D .6 ohm dual tower. http://www.nology.com/profiremotor.html It's small size made it a nice fit in the DR650's tight quarters. Yeah, the DR650 has twin plugs.

Image

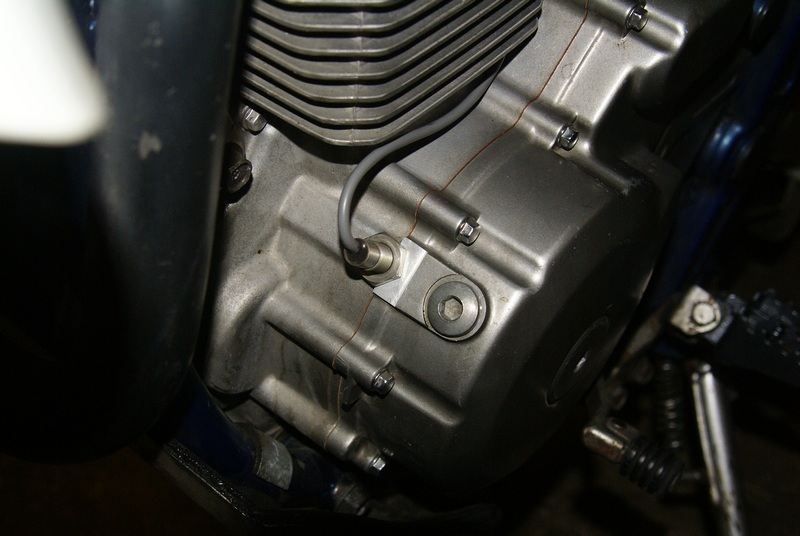
I have my sequential cam sensor finished and working... well, it works on an oscilloscope.... and VR1 with the offsetter circuit... and opto with a pull up resistor. :? But not on VR2. It's an Allegro hall IC http://www.allegromicro.com/en/Products ... bers/0616/ potted in my own machined 10mm housing. I needed a very small package to work with my small cam sprocket radius and limited space. You can see it below the tank with the teflon coated shielded wire coming out of it.

Image

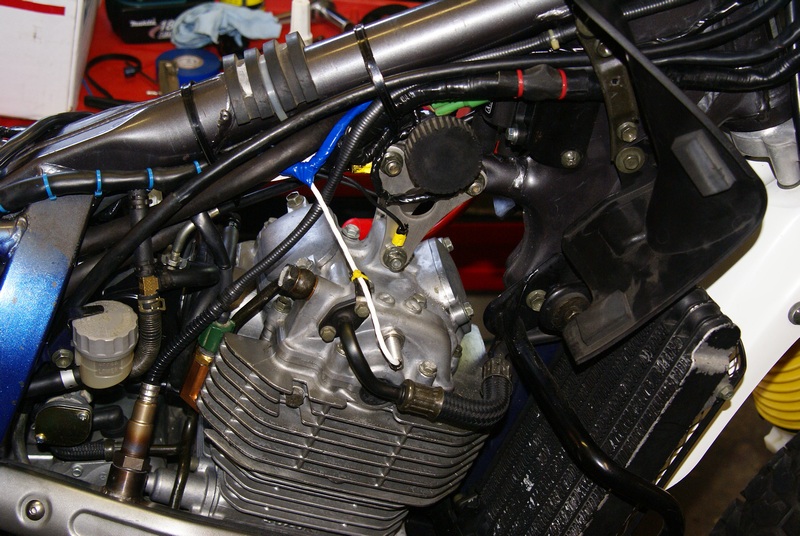
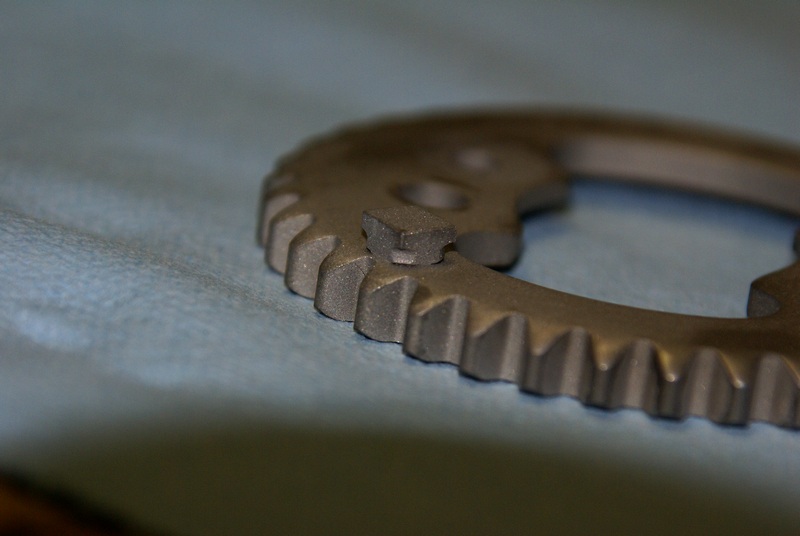
Here's the single cam tooth target I put on the cam sprocket. Just misses the chain and everything else in the cylinder head cap.

Image

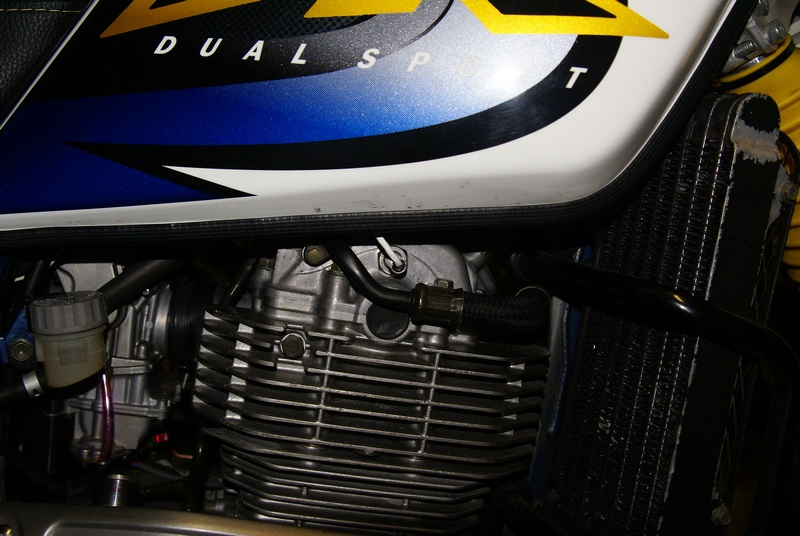
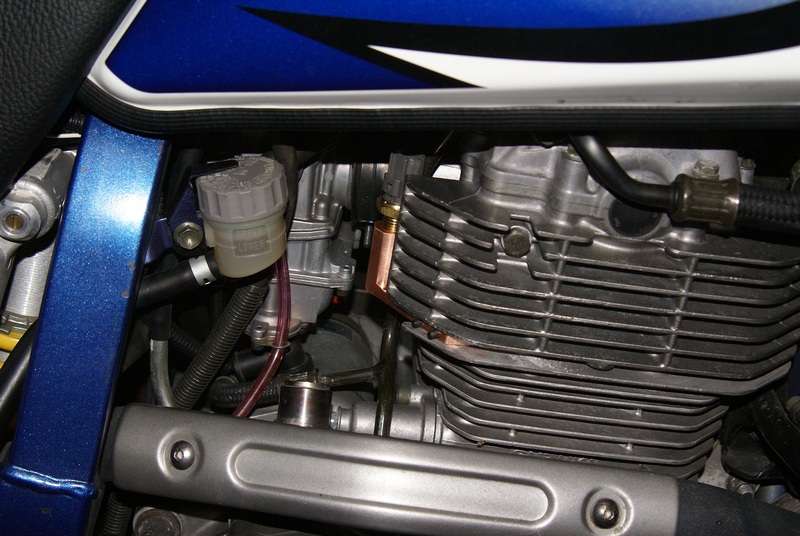
I made a copper engine temp assembly using the stock R450's temp sending unit (it's water cooled) to fit between the head and barrel of my air cooled bike. Not sure how but the thing works perfect... It looks like I won't even need to use the extended CLT range in the µs set-up as it is running right between 175 and 196 degrees at various speeds. If I run into trouble later for some reason, like cold weather riding, I'll switch over to the spark plug ring sender and turn on the extended clt range.

Image

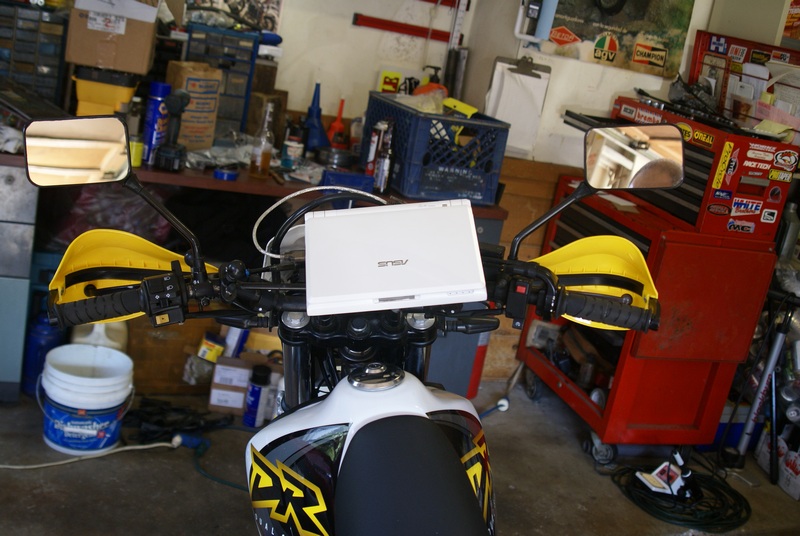
I was not enamored by the thought of having to go out for a data log session and then drive back to the shop to hook up to a PC to make changes. Soooo, the little Asus Eee-pc netbook's have hard cards instead of an actual hard drive with moving parts which I felt might die from the thumper's vibration. With 4GB of drive space it's more than enough for Windows XP, TS, Megalog Viewer, etc. I just pull over, open the netbook and make some adjustments and I'm back on my way logging. I see them all the time on ebay for $100 or less. Perfect communication with µs (with a Prolific USB to serial cable)... no resets or any funny business while data logging. I have it mounted on a RAM ball set up http://www.ram-mount.com/CatalogResults ... fault.aspx connected to the lower right handlebar clamp bolt. I just fabricated a sheet metal tray that the PC slides into nice and firmly .

Image
Image

Now it's time to hit fuel hard! I have just about all the components I need to put the system together except adapter mounts for the fuel pump and fuel pressure regulator. I have to tear out the carb to do some measuring so I can build those but I wanted to bask in the glow of my bike running on µs ignition this weekend before ripping it all apart again. :lol:

Stay tuned!
mxrob
MegaSquirt Newbie
Posts: 17
Joined: Mon Dec 14, 2009 12:21 pm

96-2011 DR650SE Dual Sport Thumper...Final!

Post by mxrob »

OK, NOW it's a success! Fuel is complete and the bike is running! :yeah!: And it's running quite well considering I only have an hour into the tuning process. MAP is certainly out of the question until I can get VR2 working for full sequential. MAP resolution is terrible on the big thumper running wasted spark. Alpha-N is OK for now.

Here's the left side of the engine with the cool carbon fuel pump cover. See the fuel filter/swirl tank buried in there? It has an upper side take off tube that I have pointing as upwards as possible to help remove trapped air (it's just a car TB injection type fuel filter). That line T's into the return line and the fuel pump flooding line (that's the big line coming off the top of the pump). That line t's directly behind the injector and goes down to the FP regulator by-pass with another big line and then comes out from under the injector and connects to the T that the filter vent connects to. You can see my extended fuel rail (black painted brass tube off the top of the TB) going forward to the stock R450 high pressure FI line. This curves around the TB and connects under it to one of the FP regulator pressure ports. The other pressure port line comes back from under the TB and connects to the outlet of the fuel pump. Sheesh... hose central. The FCR choke knob is plugging the hot start port which is cable operated on the R450. Suzuki wanted $57 just for the valve... then you'd have to buy the spring and the threaded plastic cable adapter just to hold the valve in place. Not! The FCR choke works fine. Just behind the knob is the idle air port adjuster. No having to move the butterly to adjust idle air flow and then having to re-calibrate the TPS.

Image

The final layout of the µs installation. After my serial cable connector pulled apart I decided I needed easier access to the big wiring bundle so I ditched the zillion wraps of electrical tape and made a boot out of stuff from the R450 harness instead. I was also worried about water getting shot down the back of the seat (like pressure washing the bike) and getting into the back of the µs connector. This set up addresses both issues.

Image

Right engine side. You can see the vent lines coming from the filter/swirl tank and the regulator return and FP flood line. The line going straight up connects to my return line on the CA tank. The 02 sensor is kinda close to the lower vent line so installed a protector spring just in case. You can see the end of the fuel pressure regulator behind the 02 sensor and above the starter. Yeah, it's amazing it all fit. The LC-1 oxygen sensor controller is installed behind the headlight cowling.

Image

Right side µs view. It all just fit nicely. You can see the tip of the incoming air temperature sensor just above the top of the freshly cleaned Twinair filter.

Image

The left view of the DR650FI. :D

Image

The right view of the DR650FI. :D

Image

Obviously I have a whole world of tuning to explore and perfect now but now it just boils down to saddle and keyboard time. Wow... what a bummer huh? :lol: Many many thanks to all the experienced and helpful squirter's that answered the questions that this newbie had for them. All I can say to the FI project doer's inspired by my success is :RTFM: :RTFM: :RTFM: :RTFM: :RTFM: :RTFM: :RTFM: :RTFM: :RTFM:
Last edited by mxrob on Sun Aug 22, 2010 3:08 pm, edited 1 time in total.
2whldreams
MegaSquirt Newbie
Posts: 1
Joined: Sat Jun 26, 2010 6:40 am

Re: 96-2011 DR650SE Dual Sport Thumper

Post by 2whldreams »

Greetings,
Your project is inspiring because of your flawless execution-understanding, assembling of parts and fabrication skills. I have to admit I'm a bit jealous since you make the conversion and solutions seem elementry.
I am currently doing a similar project on a 78 GS1000 and hope it ends up as professional operating as yours.
I have discovered that when an individual decides an idea has a solution, projects like yours take on an energy all their own. Add time, patience and original ideas and you have acheived what few would even consider.
Thank you for sharing your results.
24c
Helpful Squirter
Posts: 92
Joined: Thu Nov 27, 2008 1:39 pm

Re: 96-2011 DR650SE Dual Sport Thumper

Post by 24c »

Rob, I too echo the last posters sentiments. You have done yourself proud, and you're not even finished yet, but you're almost there. I wish you well with sequential mode, once you get past your VR2 issue. I am going to go back to B&G 2.890 on my black GTS1000, so that I can research the VR2 cam sensing problem, which was very similar to yours at cranking speeds, that is I could detect VR2 voltage, but not see it in TachRef, until I reduced the cam lobe to sensor clearance, and fudged the common ground with diodes.

I don't know what your Alpha-N is really like, but my Alpha-N with additive SD is performing well.

BTW, I'm sure those guys at ThumperTalk will be hooting for you too. :D
mxrob
MegaSquirt Newbie
Posts: 17
Joined: Mon Dec 14, 2009 12:21 pm

Re: 96-2011 DR650SE Dual Sport Thumper

Post by mxrob »

Thank you for the kind words guys... I can assure you my presentation was a lot easier than the execution of the project. :lol: Pretty sure that goes with the territory for a FI newbie. I was all together clueless in the beginning when I started the project in December. No FI pro now by any means but I'm glad I was coerced into taking the project on by some members the ThumperTalk DR forum. :roll: Good luck on your FI project!
mxrob
MegaSquirt Newbie
Posts: 17
Joined: Mon Dec 14, 2009 12:21 pm

Re: 96-2011 DR650SE Dual Sport Thumper

Post by mxrob »

Just an update for anyone thinking of using the Hamlin 55075 hall sensor in a project such as mine. Don't! Evidently I :RTFM: too fast and breezed right past the 85c max operating temp limit of the sensor. :oops: My sensor died after playing around with leaner VE table settings and spark advance. Glad this happened now or I might have suffered a problem much further from home. So luckily Cherry makes a same form fit and function hall gear tooth sensor. It has a 260f temp rating that will be more than adequate and the best part was when I got it in the mail today I just removed the Hamlin and screwed the Cherry into position... set the air gap at 1mm, like I had on the Hamlin, and did a quick test jumper hook up to see if I was gong to have to mess with any of the resistance settings.... The bike fired up instantly! :yeah!: I did a three hour tune/test with nary a skipped beat.

So The Hamlin is out.... well, at least for a set-up like mine where it will screw into the engine cases anyway. The part number for the Cherry sensor is GS100102. It has a 1 meter shielded lead wire and the same 12mm-1.0 threads as the Hamlin. It is about 20mm longer though.... kind of a bummer because it sticks out of the engine case a lot further than the Hamlin did.
mxrob
MegaSquirt Newbie
Posts: 17
Joined: Mon Dec 14, 2009 12:21 pm

Re: 96-2011 DR650SE Dual Sport Thumper

Post by mxrob »

R100RT
Helpful Squirter
Posts: 96
Joined: Sun Oct 05, 2008 6:41 am

Re: 96-2011 DR650SE Dual Sport Thumper

Post by R100RT »

Excellent, what are you using for a camera?
mxrob
MegaSquirt Newbie
Posts: 17
Joined: Mon Dec 14, 2009 12:21 pm

Re: 96-2011 DR650SE Dual Sport Thumper

Post by mxrob »

A GoPro Hero. It's a very cool little camera with many mounting options and is in a waterproof enclosure. 8)

http://www.goprocamera.com/
R100RT
Helpful Squirter
Posts: 96
Joined: Sun Oct 05, 2008 6:41 am

Re: 96-2011 DR650SE Dual Sport Thumper

Post by R100RT »

Cool, my brother has been using those. Gotta get one I supose.
Your bike looks to handle very nicely throughout throttle range (noted tire lofting rather easily).
Can't say my lower throttle behaviour is as nice, however I've stayed with SD throughout my tuning efforts so far, perhaps I'll venture into some blends and additive tables next too.
Post Reply